Maisie Made Logo

Maisie Made Logo

Wednesday, March 5, 2014

Possible For Mayfaire: Renaissance Faire on the Holland Patent Common

 Rose Crochet and Knit Head-wrap

The leaf and stem is knitted and the flower is crochet.  They're good as bookmarks (book thongs) too, so you can use them aside from costume purposes, all year round.


Scottish Thistle Head-wrap

I love these two little pocket-friend vipers.  I made them inspired by Blake's "The Sick Rose"...but they are way to cute to be bad guys.
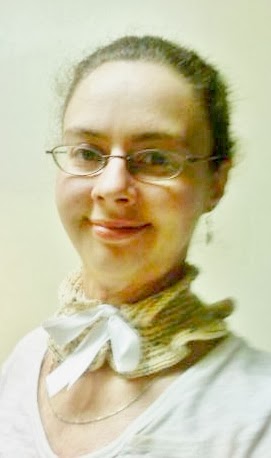


 This collar is sort of steam punky, but a lacy version would be more era appropriate.  The glasses...really make the difference.

Sunday, March 2, 2014

Commission Work


"How do I tell her...one more ball of yarn and we lose the apartment?"
 Things I have made on request: 
Broomstick Lace Neck-warmers


Nylon Purses

Cotton Kitchen Dishcloths
Baby Pumpkin Costume

Nylon Net Rose Dish Scrubbie


The Turtle Hat:  Can be a Hat and a Neck-warmer but Not Both at Once
Cat Hats
Evil Cutes and Good Cutes


Paper Weights:  Thread Crochet River Stones

Granny Bags

"How do I get more craft coupons?"


Necklaces


Cell Phone/Remote Lace Cozies


 One Size Fits Most
 
 One Button Messenger Bags

Morning Glory Cotton Bath Mitt

Hot Water Bottle Cover
  Bolero Sweater

Friday, January 31, 2014

MAKING PLARN with my friend the YARDSNAKE

TWO IAMS BAGS
 Take your bags, lay them flat and fold them into fourths with the handle of the bag at the top and the end seal of the bags below.
 Slice the bottom off of the bag as neatly as you can as close as you can, so you have more loops later on.  You're going to need a lot of bags, and the logo will show as a distorted color once you are done.  If you are a neat freak, or a purist, figure out how to get rid of the logos, copyright laws, safety restrictions for children, company information and the gratitude marks by yourself.  Or the yard snake will eat you.
 
What you are looking for with plarn is even cuts that are about 1 and a quarter inch thick.  If you make these cuts to thin, your plarn will be weak.  If you make them inconsistently, your plarn will be bumpy.  If you make them thick, your plarn will be to large to work with in a way that is comfy.  If you spin your plarn with a drop spindle (some people make time for that step but you do not have to), you will not get good results if your loops are all weird.  What you want is even, consistent cuts that are about the same.  You want many, many loops.  Join the loops together with the larks head knot, aka. when you put loops through each other and pull slightly. Twenty bags make enough for a small ball of plarn to try to practice with.


 Ignore my foot in this picture.  Because the yard snake will eat you if you don't.
 

Saturday, January 25, 2014

SQUID


A crocodile stitch Mario squid applique made out of catfish fishing line. 

Tuesday, January 14, 2014

Metallic Parachord Broomstick Lace Cuff


Materials:


Metallic Parachord

1 Size G Crochet Hook

1 Size 13 (9.0 mm) Knitting Needle


To Begin:


Make a slip-knot and insert the crochet hook in the loop.

Make 16 chain stitches.

Turn, Pull up 3 large loops in the chains you have just made and keep them on the hook.

Transfer the 4 loops on the hook to the knitting needle.

Continue down the length of the chain until you have 16 loops on the knitting needle.

 
 Turn the work over and insert the crochet hook into the first 4 loops on the knitting needle.  Pull a loop through these first 4 loops and pull the slack slightly to draw the loops together.  Single crochet 4 times into the first 4 loops.  Continue in this fashion, taking 4 loops at a time off of the knitting needle and single crocheting into these loops 4 times, so that at the end you have made 16 single crochet stitches.


Turn and pull up 16 loops through the previous 16 single crochet stitches.  You will have 4 sets of clusters, or in other words 4 X 4 = 16.


Making sure you have 16 loops and 16 single crochet stitches will keep the sides of your cuff straight.  Sometimes you will see that the gauge allows for 14 or 17, and that is ok, as long as you keep the tension relative, gauge is not crucial.


Your clusters should match each other, and you will notice the rows start stacking on one another like lego blocks.  This is the second row of the piece.  Continue in pattern until you reach the length you like that fits around the wrist of the person you are making the cuff for.  Naturally, at first, the cuff will be tight, but it does wear in when the stitches settle on each other. 


Near the end of the cuff, cease to use the knitting needle and single crochet a few rows so that you have a solid piece of crochet at the end of the cuff.  Backstitch some buttons on the end that fit through the lace holes made by the knitting needle.  These holes are what makes the broomstick lace pattern so attractive. 

Button up the piece and enjoy your cuff!  You can make the holes in the piece larger by using a larger knitting needle if you so desire. 


I have tiny hands, so I just stretched the piece over my thumb and wiggled the cuff on.  If you have large hands, have a friend help you button your cuff on.  There is no need to block para chord, wearing it will just make your cuff more pretty with time.